• TIDB源码学习笔记-DDL-CreateColumn时不同状态对Insert语句的影响

    | /

    Add Column会schema会经历none, delete-only, write-only, write-reorganization, public五个状态

    当运行insert语句时,只有处于public状态的节点才会执行成功,其他状态的节点都会无法找到该列。

    原因如下:

    insert语句经过parse, 会由ExecuetStmt()->Compile()->Optimize()->optimize()->build()中的planBuilder.buildInsert()生成查询计划。

    对于INSERT … VALUES … 会进入buildValuesListOfInsert()中:

    1
    2
    3
    4
    5
    6
    7
    8
    9
    10
    11
    12
    13
    14
    15
    16
    17
    18
    19
    20
    21
    22
    23
    24
    25
    func (b *PlanBuilder) buildInsert(ctx context.Context, insert *ast.InsertStmt) (Plan, error) {
    ...

    if len(insert.Setlist) > 0 {
    // Branch for `INSERT ... SET ...`.
    err := b.buildSetValuesOfInsert(ctx, insert, insertPlan, mockTablePlan, checkRefColumn)
    if err != nil {
    return nil, err
    }
    } else if len(insert.Lists) > 0 {
    // Branch for `INSERT ... VALUES ...`.
    err := b.buildValuesListOfInsert(ctx, insert, insertPlan, mockTablePlan, checkRefColumn)
    if err != nil {
    return nil, err
    }
    } else {
    // Branch for `INSERT ... SELECT ...`.
    err := b.buildSelectPlanOfInsert(ctx, insert, insertPlan)
    if err != nil {
    return nil, err
    }
    }

    ...
    }

    在buildValuesListOfInsert()中会由PlanBuilder.getAffectCols()确定实际要插入的列。

    1
    2
    3
    4
    5
    func (b *PlanBuilder) buildValuesListOfInsert(ctx context.Context, insert *ast.InsertStmt, insertPlan *Insert, mockTablePlan *LogicalTableDual, checkRefColumn func(n ast.Node) ast.Node) error {
    affectedValuesCols, err := b.getAffectCols(insert, insertPlan)

    ...
    }
    planbuilder.go:2415:getAffectCols():
    1
    2
    3
    4
    5
    6
    7
    8
    9
    10
    11
    12
    13
    14
    15
    16
    17
    18
    19
    20
    21
    22
    func (b *PlanBuilder) getAffectCols(insertStmt *ast.InsertStmt, insertPlan *Insert) (affectedValuesCols []*table.Column, err error) {
    if len(insertStmt.Columns) > 0 {
    // This branch is for the following scenarios:
    // 1. `INSERT INTO tbl_name (col_name [, col_name] ...) {VALUES | VALUE} (value_list) [, (value_list)] ...`,
    // 2. `INSERT INTO tbl_name (col_name [, col_name] ...) SELECT ...`.
    colName := make([]string, 0, len(insertStmt.Columns))
    for _, col := range insertStmt.Columns {
    colName = append(colName, col.Name.O)
    }
    var missingColName string
    affectedValuesCols, missingColName = table.FindCols(insertPlan.Table.VisibleCols(), colName, insertPlan.Table.Meta().PKIsHandle)
    if missingColName != "" {
    return nil, ErrUnknownColumn.GenWithStackByArgs(missingColName, clauseMsg[fieldList])
    }
    } else if len(insertStmt.Setlist) == 0 {
    // This branch is for the following scenarios:
    // 1. `INSERT INTO tbl_name {VALUES | VALUE} (value_list) [, (value_list)] ...`,
    // 2. `INSERT INTO tbl_name SELECT ...`.
    affectedValuesCols = insertPlan.Table.VisibleCols()
    }
    return affectedValuesCols, nil
    }

    在确立AffectCols时是依据table的VisibleCols来确定的:

    1
    2
    3
    4
    5
    6
    7
    8
    9
    10
    11
    12
    13
    14
    15
    16
    17
    18
    19
    20
    21
    // VisibleCols implements table.Table VisibleCols interface.
    func (t *TableCommon) VisibleCols() []*table.Column {
    if len(t.VisibleColumns) > 0 {
    return t.VisibleColumns
    }
    return t.getCols(visible)
    }

    func (t *TableCommon) getCols(mode getColsMode) []*table.Column {
    columns := make([]*table.Column, 0, len(t.Columns))
    for _, col := range t.Columns {
    if col.State != model.StatePublic {
    continue
    }
    if (mode == visible && col.Hidden) || (mode == hidden && !col.Hidden) {
    continue
    }
    columns = append(columns, col)
    }
    return columns
    }

    根据代码中的判断条件,如果列的状态不为StatePublic,那么就不会被归结为VisibleCols(), 也就不会被getAffectCols()所感知,Inser这一列的操作自然会报错。

  • TIDB源码学习笔记-Key编码后的比较

    | /

    key经过编码之后是字节数组,两个字节数组的比较方案如下所示:

    判断两个字节数组的地址是否一样,如果一样则说明在同一段内存存储,直接判断长度,长度小的key编码较小。

    如果首地址不一样,则按照两个数组的较小长度逐个元素比较,如有不同直接按照元素大小返回。

    当在较小长度内所有元素都相同,则较大长度字节数组大于较小长度数组。如果两者长度相同且所有元素相同,则数组大小相同。

    example

    例如有如下两个表:

    table1, tableId为1, 第三列value含有索引,indexID为1

    1
    2
    3
    4
    rowid, name,        role, value
    1, "TiDB", "SQL Layer", 10
    2, "TiKV", "KV Engine", 20
    3, "PD", "Manager", 30

    table2, tableId为2, 第二列到第四列都含有索引,indexID从1到4

    1
    2
    3
    4
    rowid,   name, school, age, graduate date, personID(unique)
    1, "XiaoMing", "A", 19, 2020-06-20, 210283
    2, "XiaoHong", "C", 19, 2019-03-20, 270447
    3, "XiaoWang", "B", 18, 2018-07-01, 159668

    则其在Tikv中排布情况如下所示:

    1
    2
    3
    4
    5
    6
    7
    8
    9
    10
    11
    12
    13
    14
    15
    16
    17
    18
    19
    20
    21
    t1_i1_intFlag{10}_1 --> null
    t1_i1_intFlag{20}_2 --> null
    t1_i1_intFlag{30}_3 --> null
    t1_r1 --> ["TiDB", "SQL Layer", 10]
    t1_r2 --> ["TiKV", "KV Engine", 20]
    t1_r3 --> ["PD", "Manager", 30]
    t2_i1_bytesFlag{A}_1 --> null
    t2_i1_bytesFlag{B}_3 --> null
    t2_i1_bytesFlag{C}_2 --> null
    t2_i2_uintFlag{18}_3 --> null
    t2_i2_uintFlag{19}_1 --> null
    t2_i2_uintFlag{19}_2 --> null
    t2_i3_uintFlag{2018-07-01}_3 --> null
    t2_i3_uintFlag{2019-03-20}_2 --> null
    t2_i3_uintFlag{2020-06-20}_1 --> null
    t2_i4_uintFlag{159668} --> 3
    t2_i4_uintFlag{210283} --> 1
    t2_i4_uintFlag{270447} --> 2
    t2_r1 --> ["XiaoMing", "A", 19, 2020-06-20]
    t2_r2 --> ["XiaoHong", "B", 19, 2019-03-20]
    t2_r3 --> ["XiaoWang", "C", 18, 2018-07-01]

    tikv是一个全局有序的分布式Key-Value引擎,因此,通过以上的设计可以让同一个表下同一个indexID的索引按照ColumnsValue分布到一段连续的区间上.这个columnsValue的编码方式主要在codec模块中。

    columnsValue在进行实际的编码时,会在编码开始前添加一个codeFlag,如下所示:

    1
    2
    3
    4
    5
    6
    7
    8
    9
    10
    11
    12
    13
    14
    const (
    NilFlag byte = 0
    bytesFlag byte = 1
    compactBytesFlag byte = 2
    intFlag byte = 3
    uintFlag byte = 4
    floatFlag byte = 5
    decimalFlag byte = 6
    durationFlag byte = 7
    varintFlag byte = 8
    uvarintFlag byte = 9
    jsonFlag byte = 10
    maxFlag byte = 250
    )

    按照本人目前的理解,主要有两个作用:

    • 一是用来识别不同数据类型的编码方案。比如int64 compareble就会用intFlag标记,string compareable就会用bytesFlag来标记。

    • 二是方便统一不同类型对于边界值处理。在tidb中任何类型都有三个较为特殊的值,Null, MinNotNull, MaxValue.它主要用来表示一些筛选条件的range边界。这三个值的codeFlag是:

    1
    2
    3
    Null       --> NilFlag byte = 0
    MinNotNull --> bytesFlag byte = 1
    MaxValue --> maxFlag byte = 250

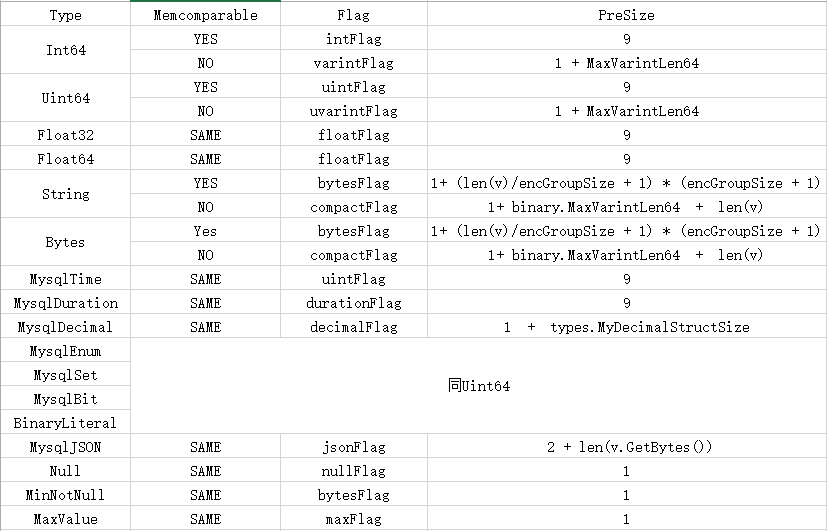
    比如 select * from table1 where value < 15 这样一个查询, value的range就是[MinNotNull, 15). 对于这三个特殊值,并不依据具体的类型做编码,而是通过codeFlag这个字节来标识。结合key的编码比较方案,就可以实现对range边界的确定。

    例如

    1
    select from * from table2 where school <= "B" AND school is Not Null

    这样一个查询, 生成的range就是:
    [MaxNotNull, "B"]
    对应到tikv中的key编码就是:
    [t2_i1_bytesFlag, t2_i1_bytesFlag{B}]
    而包含Null的查询:

    1
    select from * from table2 where school <= "B"

    这样一个查询, 生成的range就是:
    [Null, "B"]
    对应到tikv中的key编码就是:
    [t2_i1_NilFlag, t2_i1_bytesFlag{B}]

  • TIDB源码学习笔记-range的生成

    | /

    point

    1
    2
    3
    4
    5
    6
    // Point is the end point of range interval.
    type point struct {
    value types.Datum
    excl bool // exclude
    start bool
    }

    ranger

    1
    2
    3
    4
    5
    6
    7
    8
    9
    10
    11
    12
    13
    14
    15
    16
    17
    18
    19
    20
    21
    22
    23
    24
    25
    26
    27
    28
    29
    // RangeType is alias for int.
    type RangeType int

    // RangeType constants.
    const (
    IntRangeType RangeType = iota
    ColumnRangeType
    IndexRangeType
    )

    // Range represents a range generated in physical plan building phase.
    type Range struct {
    LowVal []types.Datum
    HighVal []types.Datum

    LowExclude bool // Low value is exclusive.
    HighExclude bool // High value is exclusive.
    }

    // fullRange is (-∞, +∞).
    var fullRange = []point{
    {start: true},
    {value: types.MaxValueDatum()},
    }

    FullIntRange unsigned [0, MaxUint64] signed [MinInt64, MaxInt64]
    FullRange [,MaxValueDatum) [null, +∞)
    FullNotNullRange (MinNotNullDatum, MaxValueDatum) (-∞, +∞)
    NullRange [,] [null, null]

    单列range生成过程

    • 通过builder将expression转化为[]point.主要的转化逻辑如下表所示:
    method return 备注
    buildFromColumn [-inf, 0) (0, +inf] 列名表达式等价于列名为真。
    buildFromConstant nil 或者 fullRange 当常量Eval转化出错,或者常量为Null或者常量为0时,返回nil,否则返回fullRange
    buildFromScalarFunc
    buildFromBinOp a==NULL [,] a==1 [1, 1]
    a!=1 [-inf, 1) (1, +inf])
    a>1 (1, +inf]
    ast.LogicAnd 取交集
    ast.LogicOr 取并集 取交集和取并集通过merge实现,通过flag区分。merge函数的假设:
    a, b 两个区间均已经做过去重
    单个区间序列内部不会有重叠的部分
    buildFromIsTrue [-inf, 0) (0, +inf] 还有包含is not和with null的处理
    buildFromIsFalse [0, 0] 还有包含is not的处理
    buildFromIn a in (1, 2, 3)
    {[1, 1], [2, 2], [3, 3]}
    对每个点生成一个rangePoint,然后排序去重。
    buildFromPatternLike a LIKE ‘abc%’ [abc, abd)
    a LIKE ‘abc_’ (abc, abd)
    找前缀然后再计算起始点和终止点。
    isNull [,]
    buildFromNot 对于Not前缀的处理
    • 通过points2TableRanges和points2Ranges将point转化为range.

      对于TableRange, 会将points中的null移除,同时将MinNotNull转化为MinInt64或者MinUint64, MaxValue转化为MaxInt64或者MaxUint64

      再将point转化为range时,会将point转化为对应的FieldType,并将转化后的数据与原数据作比较,以此来修正point的excl属性,这部分逻辑在convertPoint中。举例 “a > 1.9” 在1.9转化为整形时会变为“a>=2”.

      不同数据的比较逻辑放在datum.go中的CompareDatum中,比较特殊的几个类型的大小关系如下所示:

      • MinNotNullDatum用来表示最小值即-inf
      • MaxValueDatum用来表示最大值即+inf
      • Null < MinNotNull < 其他类型的具体值 < MaxValue

        如果column无Null值,那么会移除[null, null]这样的range.

    • 得到range之后,对于Column,会尝试进行range的裁剪和range的合并

      • range裁剪的应用场景猜测:

        对于string列和bytes列,其有一定长度,比如col1 VarChar(6), 如果range中的端点长度超过这个值,即15,比如col1 > “12345678”,那么这个端点就会被裁剪为 col1 >= “123456”

      • range 合并场景:

        [a, b] [c, d] 如果a <= c 并且b >= c,那么这两个区间就可以合并为[a, max(b, d)]

  • TIDB源码学习笔记-row的编码格式

    | /

    方案一 实现在util/rowcodec

    会记录当前行的空置和非空值数量

    如果总列数大于255,会用uint32存储column id,否则使用byte存储column id.

    会将同一行非空列排布在前面,空值列排布在后面,分别按照column id进行排序。 每一个非空列column id对应一个value.
    空值列的column id对应的value位置没有value重新赋值的操作。

    会有一个notNullIdx来区分非空列和空列的界限。

    最后转化为bytes的结构

    • CodecVer: 1 byte
    • flag: 1 byte : large 1 small 0
    • numNotNullCols: 2 bytes
    • numNullCols: 2 bytes
    • colIDs32: uint32[] 转 byte[], 如果是small则为colIDs byte[]
    • offsets32: uint32[] 转 byte[], 如果是small则为sffsets u16[] 转 byte[]
    • data: byte[]

      方案二

    这套方案比较简单,申请row长度2倍的datum数组,前面用来存储数值,后面用来存储column id 一一对应。

  • TIDB源码学习笔记-基本类型编解码方案

    | /

    TIDB基本类型的编码方案

    TIDB在编码不同的数据类型时会在编码前部添加一个字节的Flag用来区分不同的编码方案。同时,TIDB支持具有Memcomparable特性的编码,Memcomparable是指保证编码前和编码后的比较关系不变。在TIDB中,对于Key的编码都是要求Memcomparable的,而对于Value的编码则不要求Memcomparable,可以采用更节省空间的编码方案。

    在进行编码前,会先依据数据类型预先申请一定尺寸的byte,然后再进行编码。

    如下是目前的Flag,用于标识不同的编码方案

    1
    2
    3
    4
    5
    6
    7
    8
    9
    10
    11
    12
    13
    14
    const (
    NilFlag byte = 0
    bytesFlag byte = 1
    compactBytesFlag byte = 2
    intFlag byte = 3
    uintFlag byte = 4
    floatFlag byte = 5
    decimalFlag byte = 6
    durationFlag byte = 7
    varintFlag byte = 8
    uvarintFlag byte = 9
    jsonFlag byte = 10
    maxFlag byte = 250
    )

    下表是数据类型与Flag的对应关系以及相应的编码尺寸计算方法,具体的编码方案会在后续一一展开。

    INT64

    comparable

    这种方式保证编码后的二进制排序结果与编码前的是完全相同的。

    编码方法: uint64(num) ^ signMask

    const signMask uint64 = 0x8000000000000000

    signed int binary after code
    1 0000 0000 0000 0001 1000 0000 0000 0001
    0 0000 0000 0000 0001 1000 0000 0000 0001
    -1 1111 1111 1111 1111 0111 1111 1111 1111
    -2 1111 1111 1111 1110 0111 1111 1111 1110

    uncomparable:

    这种方法不能保证编码后是严格有序的。

    编码方法: PutVarint函数

    PutVarint:

    步骤一:左移去掉符号位,如果是负数则对移位后的数取反

    步骤二:将得到的数字从低到高每七位放入一个字节中,字节的第一位表示是否有后续字节。

    举例:

    原始数据 16进制表示 步骤一结果 步骤二结果
    1 0x1 0x02 0x02
    -1 0xffffffffffffffff 0x01 0x01
    128 0x80 0x0100 0x8002
    127 0x7f 0xfe 0xfe01

    Uint64

    comparable

    直接写入二进制

    uncomparable

    将二进制表示从低到高每七位放入一个字节中,字节的第一位表示是否有后续字节,其实就是去掉int64的uncomparable中符号处理那一步后剩下的步骤。

    Float32 Float64

    Go的浮点数是按照IEEE 754浮点数标准存储的,TIDB直接对二进制表示进行操作

    将正浮点数的符号位置1,将负浮点数的二进制表示按位取反

    这样编码后的二进制是先比较符号位,再比较指数位,最后比较小数位,就可以保证编码值是升序的。对于负浮点数的比较因为是进行了取反,所以也能保证是升序的。如果要降序只要将编码值取反即可。

    1
    2
    3
    4
    5
    6
    7
    8
    9
    func encodeFloatToCmpUint64(f float64) uint64 {
    u := math.Float64bits(f)
    if f >= 0 {
    u |= signMask
    } else {
    u = ^u
    }
    return u
    }

    Byte

    comparable

    [group1][marker1]…[groupN][markerN]

    group 是补零之后的8字节切片

    markder = 0xFF - 补零数量

    举例:

    [] -> [0, 0, 0, 0, 0, 0, 0, 0, 247]
    
    [1, 2, 3] -> [1, 2, 3, 0, 0, 0, 0, 0, 250]
    
    [1, 2, 3, 0] -> [1, 2, 3, 0, 0, 0, 0, 0, 251]
    
    [1, 2, 3, 4, 5, 6, 7, 8] -> [1, 2, 3, 4, 5, 6, 7, 8, 255, 0, 0, 0, 0, 0, 0, 0, 0, 247]
    

    uncomparable

    数据长度 + 实际数据的二进制

    String

    如果有排序规则,则使用排序规则得到的Bytes,否则直接用String本身的Bytes

    1
    2
    3
    4
    5
    6
    func encodeString(b []byte, val types.Datum, comparable bool) []byte{
    if collate.NewCollationEnabled() && comparable {
    return encodeBytes(b, collate.GetCollator(val.Collation()).Key(val.GetString()), true)
    }
    return encodeBytes(b, val.GetBytes(), comparable)
    }

    MysqlTime

    先进行时区转化,全部转换为UTC时区后将Time转为uint64,再以uint64的形式进行编码。

    1
    2
    3
    4
    5
    6
    7
    8
    9
    10
    11
    12
    13
    // ToPackedUint encodes Time to a packed uint64 value.
    //
    // 1 bit 0
    // 17 bits year*13+month (year 0-9999, month 0-12)
    // 5 bits day (0-31)
    // 5 bits hour (0-23)
    // 6 bits minute (0-59)
    // 6 bits second (0-59)
    // 24 bits microseconds (0-999999)
    //
    // Total: 64 bits = 8 bytes
    //
    // 0YYYYYYY.YYYYYYYY.YYdddddh.hhhhmmmm.mmssssss.ffffffff.ffffffff.ffffffff

    MysqlDuration

    duration可能有负值,所以无法直接用string来进行编码,采用的是同Int comparable相同的编码。

    MysqlDecimal

    编码方式: precision + frac + WriteBin函数

    WriteBin: 每 9 位十进制数字包装成 4 个字节. 其中整数和小数部分分别确定所需的存储空间. 如果数字位数为 9 的倍数, 则每 9 位十进制数字各采用 4 个字节进行存储, 对于剩余不足 9 位的数字, 所需的存储空间如下表所示:

    剩余数字位数 存储所需字节数
    0 0
    1-2 1
    3-4 2
    5-6 3
    7-9 4

    举例:

    1234567890.1234

    以9位数字以及小数点为边界,可将decimal类型拆分为如下所示:

    1 234567890 123400000
    

    假设存储位数为有效位数为14,小数位为4,使用16进制表示为三部分:

    00-00-00-01  0D-FB-38-D2  07-5A-EF-40
    

    现在,中间部分已经是被填满,它存储了9位的十进制数字:

    ............  0D-FB-38-D2  ............
    

    第一部分只有一个十进制数字,所以我们可以只用一个字节来存储,而不必浪费四个字节:

    01 0D-FB-38-D2 ............
    

    现在,最后一部分,它是123400000,我们可以用两个字节来存储:

    01 0D-FB-38-D2 04-D2
    

    因此,我们将一个12个字节的数字使用7字节进行了表示,现在需要将最高位反转来得到最后的结果:

    81 0D FB 38 D2 04 D2
    

    如果要表示 -1234567890.1234,需要将各个位取反:

    7E F2 04 C7 2D FB 2D
    

    最高位反转,是为了保证有相同有效位数和有效小数位的DECIMAL类型编码后的二进制具有comparable特性。原因如下:

    首先,最高位的置不影响原先数值的表示,因为不管第一部分剩多少位数字,它永远不会取到最高位,所以正数的DECIMAL类型的comparable可以得到保证。

    其次,通过最高位置1再反转的形式,可以保证所有的负数的二进制编码都小于正数的二进制编码,即保证了正数和负数二进制编码之间的comparable。

    最后,负数编码的comparable则是通过将正数编码所有位取反保证的。

    MysqlEnum MysqlSet MysqlBit BinaryLiteral

    通过各自的ToNumber或者ToInt方法转化为uint64进行编码

    MysqlJSON

    TypeCode + Value

    TypeCode:

    1
    2
    3
    4
    5
    6
    7
    8
    9
    10
    11
    12
    13
    14
    15
    16
    // TypeCodeObject indicates the JSON is an object.
    TypeCodeObject TypeCode = 0x01
    // TypeCodeArray indicates the JSON is an array.
    TypeCodeArray TypeCode = 0x03
    // TypeCodeLiteral indicates the JSON is a literal.
    TypeCodeLiteral TypeCode = 0x04
    // TypeCodeInt64 indicates the JSON is a signed integer.
    TypeCodeInt64 TypeCode = 0x09
    // TypeCodeUint64 indicates the JSON is a unsigned integer.
    TypeCodeUint64 TypeCode = 0x0a
    // TypeCodeFloat64 indicates the JSON is a double float number.
    TypeCodeFloat64 TypeCode = 0x0b
    // TypeCodeString indicates the JSON is a string.
    TypeCodeString TypeCode = 0x0c

    Value []byte

    Null

    NilFlag

    MinNotNull

    bytesFlag

    MaxValue

    maxFlag

    编码模块位置

    • util/codec
    • tablecodec
    • util/rowcodec
  • 二叉树的遍历方法总结

    |

    二叉树的遍历方法总结

    二叉树的遍历有前序遍历,中序遍历,后续遍历和层序遍历,这几种方法都可以通过递归和循环来实现。

    二叉树数据结构定义

    1
    2
    3
    4
    5
    6
    7
    8
    9
    /**
    * Definition for a binary tree node.
    * struct TreeNode {
    * int val;
    * TreeNode *left;
    * TreeNode *right;
    * TreeNode(int x) : val(x), left(NULL), right(NULL) {}
    * };
    */

    二叉树的前序遍历

    • 递归实现

      1
      2
      3
      4
      5
      6
      7
      8
      9
      10
      11
      12
      13
      14
      15
      16
      17
      18
      19
      20
      class Solution {
      public:
      vector<int> preorderTraversal(TreeNode* root) {
      if(!root){
      return {};
      }
      vector<int> res;
      preorderTraversal(root,res);
      return res;
      }
      void preorderTraversal(TreeNode* root, vector<int>& res){
      if(!root){
      return;
      }
      res.push_back(root->val);
      preorderTraversal(root->left,res);
      preorderTraversal(root->right,res);
      return;
      }
      };
    • 循环实现

      1
      2
      3
      4
      5
      6
      7
      8
      9
      10
      11
      12
      13
      14
      15
      16
      17
      18
      19
      20
      21
      22
      23
      class Solution {
      public:
      vector<int> preorderTraversal(TreeNode* root) {
      if(!root){
      return {};
      }
      vector<int> res;
      stack<TreeNode*> nodes;
      nodes.push(root);
      while(!nodes.empty()){
      TreeNode* node = nodes.top();
      nodes.pop();
      res.push_back(node->val);
      if(node->right){
      nodes.push(node->right);
      }
      if(node->left){
      nodes.push(node->left);
      }
      }
      return res;
      }
      };

    二叉树的中序遍历

    • 递归实现

      1
      2
      3
      4
      5
      6
      7
      8
      9
      10
      11
      12
      13
      14
      15
      16
      17
      class Solution {
      public:
      vector<int> inorderTraversal(TreeNode* root) {
      if(!root) return{};
      vector<int> res;
      inorderTraversal(root,res);
      return res;
      }
      void inorderTraversal(TreeNode* root, vector<int>& res){
      if(!root){
      return;
      }
      inorderTraversal(root->left, res);
      res.push_back(root->val);
      inorderTraversal(root->right,res);
      }
      };
    • 循环实现

      1
      2
      3
      4
      5
      6
      7
      8
      9
      10
      11
      12
      13
      14
      15
      16
      17
      18
      19
      class Solution {
      public:
      vector<int> inorderTraversal(TreeNode* root) {
      stack<TreeNode*> s;
      vector<int> res;
      TreeNode* r = root;
      while(!s.empty() || r!=NULL){
      while(r!=NULL){
      s.push(r);
      r = r->left;
      }
      r = s.top();
      s.pop();
      res.push_back(r->val);
      r=r->right;
      }
      return res;
      }
      };

    二叉树的后序遍历

    • 递归实现

      1
      2
      3
      4
      5
      6
      7
      8
      9
      10
      11
      12
      13
      14
      15
      16
      17
      class Solution {
      public:
      vector<int> postorderTraversal(TreeNode* root) {
      vector<int> res;
      if(!root) return {};
      postorderTraversal(root,res);
      return res;
      }
      void postorderTraversal(TreeNode* root, vector<int>& res){
      if(!root){
      return;
      }
      postorderTraversal(root->left,res);
      postorderTraversal(root->right,res);
      res.push_back(root->val);
      }
      };
    • 循环实现

      1
      2
      3
      4
      5
      6
      7
      8
      9
      10
      11
      12
      13
      14
      15
      16
      17
      18
      19
      20
      21
      22
      23
      24
      25
      26
      27
      28
      class Solution {
      public:
      vector<int> postorderTraversal(TreeNode* root) {
      if(!root) return {};
      stack<TreeNode*> nodes;
      vector<int> res;
      TreeNode* pre = NULL;
      nodes.push(root);
      while(!nodes.empty()){
      TreeNode* node = nodes.top();

      if( (node->left==NULL && node->right==NULL) ||
      (pre!=NULL && (node->left==pre || node->right==pre))){
      pre = node;
      res.push_back(node->val);
      nodes.pop();
      }else{
      if(node->right){
      nodes.push(node->right);
      }
      if(node->left){
      nodes.push(node->left);
      }
      }
      }
      return res;
      }
      };

    二叉树的层序遍历

    • 递归实现

      1
      2
      3
      4
      5
      6
      7
      8
      9
      10
      11
      12
      13
      14
      15
      16
      17
      18
      19
      20
      class Solution {
      public:
      vector<vector<int>> levelOrder(TreeNode* root) {
      vector<vector<int> > res;
      if(root==NULL) return res;
      levelOrder(root,res,0);
      return res;
      }
      void levelOrder(TreeNode* root, vector<vector<int> >&res, int level){
      if(root==NULL) return;
      if(res.size()==level){
      res.push_back(vector<int>(1,root->val));
      }else{
      res[level].push_back(root->val);
      }
      levelOrder(root->left,res,level+1);
      levelOrder(root->right,res,level+1);
      return;
      }
      };
    • 循环实现

      1
      2
      3
      4
      5
      6
      7
      8
      9
      10
      11
      12
      13
      14
      15
      16
      17
      18
      19
      20
      21
      22
      23
      24
      25
      26
      27
      28
      29
      class Solution {
      public:
      vector<vector<int>> levelOrder(TreeNode* root) {
      vector<vector<int> > res;
      if(!root) return res;
      queue<TreeNode*> nodes;
      nodes.push(root);
      int level=0;
      while(!nodes.empty()){
      int level_size = nodes.size();
      int count = 0;
      res.push_back(vector<int>(0));
      while(count<level_size){
      TreeNode* node = nodes.front();
      nodes.pop();
      res[level].push_back(node->val);
      count++;
      if(node->left){
      nodes.push(node->left);
      }
      if(node->right){
      nodes.push(node->right);
      }
      }
      level++;
      }
      return res;
      }
      };
  • 设置linux开机启动脚本自动联网认证

    |

    由于学校的网络需要认证上网,每次服务器上网都用个人账号认证,因此需要配置下开机启动脚本使其自动上网。(其实就是没钱惹的祸)

    一、上网认证的脚本

    先安装依赖:

    1
    2
    3
    sudo apt-get install python-pip
    sudo pip3 install schedule
    sudo pip3 install argparse

    task.py
    1
    2
    3
    4
    5
    6
    7
    8
    9
    10
    11
    12
    13
    14
    15
    16
    17
    18
    19
    20
    21
    22
    23
    24
    25
    26
    27
    28
    29
    30
    31
    32
    33
    34
    35
    36
    37
    38
    39
    40
    41
    42
    43
    44
    import schedule
    import time
    from urllib.parse import quote, unquote
    import requests
    import argparse

    def job(User,Pass):
    base_url = 'http://auth.dlut.edu.cn'
    try:
    resp = requests.get(base_url)
    print("conneting...")
    except Exception:
    #print("Already connected...")
    return
    query = resp.text[resp.text.find('wlanuserip'):resp.text.find('</script>')]
    query_str = quote(quote(query))

    url = base_url + '/eportal/InterFace.do?method=login'
    data = {
    'userId': User, # username 1
    'password': Pass, # password
    'service': '', # empty
    'queryString': query_str,
    'operatorPwd': '', # empty
    'operatorUserId': '', # empty
    'validcode': '', # empty
    }
    headers = {'Content-Type': 'application/x-www-form-urlencoded; charset=UTF-8'}
    resp = requests.post(url, data, headers=headers)
    print(resp.status_code)
    print(resp.text)
    parser = argparse.ArgumentParser(description='connect to dlut')
    parser.add_argument('-u',type=str, help='user name')
    parser.add_argument('-p',type=str, help='user name')
    args = parser.parse_args()
    User = args.u
    Pass = args.p

    job(User, Pass)
    schedule.every(300).minutes.do(job,User,Pass)

    while True:
    schedule.run_pending()
    time.sleep(300)

    其主要作用是进行认证链接,命令行调用格式为:

    1
    python3 task.py -u username -p passwd

    username是认证用户名,passwd是对应密码

    二、编写bash脚本调用登陆脚本

    connect.sh
    1
    2
    3
    4
    5
    6
    #!/bin/bash
    python3 /home/sie/netset/task.py -u username -p passwd &
    ```
    添加可执行权限:
    ``` bash
    chmod +x connect.sh

    将connect.sh和task.py都放到同一目录下 设为path_to_sp

    三、在/etc/rc.local里添加开机启动脚本命令

    • 配置rc-local.service服务使其能够执行开机启动脚本 参考教程

    • root权限创建/etc/rc.local文件并写入开机启动的脚本

      1
      2
      3
      4
      5
      6
      7
      8
      9
      10
      11
      12
      13
      14
      #!/bin/sh -e
      #
      # rc.local
      #
      # This script is executed at the end of each multiuser runlevel.
      # Make sure that the script will "exit 0" on success or any other
      # value on error.
      #
      # In order to enable or disable this script just change the execution
      # bits.
      #
      # By default this script does nothing.
      su -s /bin/sh sie -c"path_to_sp/connect.sh"
      exit 0

    其中path_to_sp为connect.sh和task.py的目录

    至此开机启动配置结束。

    以前一直想搞定开机启动脚本的事情,但是总不得其要点,特此记录,以后还要多多了解原理才是。

  • 服务器环境搭建

    ubuntu18.04-server
    cuda10.1
    cudann7.5.0

    安装显卡驱动

    1. linux查看显卡型号

      lshw -numeric -C display

    2. 下载nvidia官方驱动

      官网链接

    3. bios禁用禁用secure boot

    4. 禁用nouveau

      打开文件

      sudo vim /etc/modprobe.d/blacklist.conf
      

      在最后一行添加:

      blacklist nouveau
      

      执行如下命令生效

      sudo update-initramfs -u
      
    5. 重启

      使用命令查看nouveau有没有运行

      lsmod | grep nouveau  # 没输出代表禁用生效
      
    6. 停止可视化界面

      sudo telinit 3
      
    7. 安装驱动

      先添加可执行权限

      sudo chmod a+x filename.run
      

      执行安装:

      sudo ./filename.run -no-opengl-files
      

      -noopengl-files这个参数一定要加,否则会循环登录

    安装CUDA10.1

    1. 下载cuda10.1安装文件

      官网链接

    1. 运行安装

      执行安装文件进行安装,同nvidia驱动的执行方式。

      注意此时不需要选择安装驱动。驱动版本要注意跟cuda版本相对应。

    安装cudann

    请见官网安装教程

  • OpenPose环境搭建笔记

    OpenPose环境搭建笔记

    编译caffe

    • recipe for target ‘.build_release/src/caffe/proto/caffe.pb.o’ failed

    参考教程:
    https://blog.csdn.net/w5688414/article/details/79478695

    • ./include/caffe/util/hdf5.hpp:6:18: fatal error: hdf5.h: No such file or directory

    解决办法:在Makefile.config找到以下行并添加蓝色部分

    INCLUDE_DIRS := $(PYTHON_INCLUDE) /usr/local/include /usr/include/hdf5/serial

    LIBRARY_DIRS := $(PYTHON_LIB) /usr/local/lib /usr/lib /usr/lib/x86_64-Linux-gnu/hdf5/serial

    3.1 如果仍然提示找不到lhdf5和lhdf5_hl(这是因为ubuntu16.04的文件包含位置发生了变化,尤其是需要用到的hdf5的位置,所以需要更改这一路径)选自
    caffe —找不到lhdf5_hl和lhdf5的错误

    解决办法:然后根据情况执行下面两句:

    cd /usr/lib/x86_64-linux-gnu

    sudo ln -s libhdf5_serial.so.10.1.0 libhdf5.so

    sudo ln -s libhdf5_serial_hl.so.10.0.2 libhdf5_hl.so

    /usr/include/c++/5/typeinfo:39:37: error: expected ‘}’ before end of line
    /usr/include/c++/5/typeinfo:39:37: error: expected unqualified-id before end of line
    /usr/include/c++/5/typeinfo:39:37: error: expected ‘}’ before end of line
    /usr/include/c++/5/typeinfo:39:37: error: expected ‘}’ before end of line
    /usr/include/c++/5/typeinfo:39:37: error: expected ‘}’ before end of line
    /usr/include/c++/5/typeinfo:39:37: error: expected declaration before end of line
    Makefile:588: recipe for target ‘.build_release/src/caffe/proto/caffe.pb.o’ failed
    make: *** [.build_release/src/caffe/proto/caffe.pb.o] Error 1

    CXXFLAGS += -pthread -fPIC $(COMMON_FLAGS) $(WARNINGS) -std=c++11
    NVCCFLAGS += -D_FORCE_INLINES -ccbin=$(CXX) -Xcompiler -fPIC $(COMMON_FLAGS) -std=c++11
    LINKFLAGS += -pthread -fPIC $(COMMON_FLAGS) $(WARNINGS) -std=c++11

    • Unsupported gpu architecture ‘compute_20’

    注释Makefile.config 中 :

    # CUDA architecture setting: going with all of them.
    # For CUDA < 6.0, comment the *_50 through *_61 lines for compatibility.
    # For CUDA < 8.0, comment the *_60 and *_61 lines for compatibility.
    # For CUDA >= 9.0, comment the *_20 and *_21 lines for compatibility.
    CUDA_ARCH :=    -gencode arch=compute_30,code=sm_30 \
                    -gencode arch=compute_35,code=sm_35 \
                    -gencode arch=compute_50,code=sm_50 \
                    -gencode arch=compute_52,code=sm_52 \
                    -gencode arch=compute_60,code=sm_60 \
                    -gencode arch=compute_61,code=sm_61 \
                    -gencode arch=compute_61,code=compute_61
    

    https://blog.csdn.net/fogxcg/article/details/75332146

    • build opencv3.4

    cmake -D CMAKE_BUILD_TYPE=Release -D CMAKE_INSTALL_PREFIX=/usr/local -D PYTHON3_EXECUTABLE=/usr/bin/python3 -D PYTHON_INCLUDE_DIR=/us
    r/include/python3 -D PYTHON_INCLUDE_DIR2=/usr/include/x86_64-linux-gnu/python3.5m -D PYTHON_LIBRARY=/usr/lib/x86_64-linux-gnu/libpython3.5m.so -D PYTHON3_NUMPY_INCLUDE_DIRS=/usr/lib/python3/dist-packages/numpy/core/include/

    • levelDB出错

    https://blog.csdn.net/jyl1999xxxx/article/details/80583465

    编译openpose

    • cuda结构不共存 Unsupported gpu architecture ‘compute_xx’

    在cmake-gui 中选择 CUDA_ARCH 为mannul 然后再删掉其中不符合的结构

    • g++: error trying to exec ‘cc1plus’: execvp: 没有那个文件或目录

    gcc g++ 版本不兼容

    https://blog.csdn.net/yile0000/article/details/80105625

    nvidia驱动

    https://blog.csdn.net/wf19930209/article/details/81877822

    sudo service lightdm stop

    • gflags.cc is being linked both statically and dynamically

    https://github.com/google/glog/issues/53

    修改CmakeCache.txt中的
    GFLAGS_LIBRARY:FILEPATH=/usr/local/lib/libgflags.a
    改为:
    GFLAGS_LIBRARY:FILEPATH=/usr/local/lib/libgflags.so
    然后重新编译

    • [libprotobuf ERROR google/protobuf/message_lite.cc:123] Can’t parse message of type “caffe.NetParameter” because it is missing required fields: layer[0].clip_param.min, layer[0].clip_param.max

    要用openpose自带的caffe库

    选择openpose编译caffe时选项可以在3rdparty/caffe中设置编译参数

  • 使用python搭建小型搜索引擎

    | /

    项目代码链接

    一、目标

    为准备信息检索课程的期末大作业,因此我使用python搭建了一个小型的搜索引擎,其功能是检索大工新闻网的新闻。

    二、原理和工具简介

    2.1 原理

    该搜索引擎的原理是采用scrapy对大工新闻网进行爬虫,提取出文字新闻,并将新闻内容存入数据库A,再利用Django框架搭建一个搜索服务器,在服务器上部署Haystack+Whoosh搜索引擎,使用jieba分词工具来进行中文分词和停用词过滤。通过搜索引擎工具建立索引文件后,在前端完成用户交互界面,实现一个完整的小型搜索引擎。

    2.2 工具简介

    • Scrapy

      Python开发的一个快速、高层次的屏幕抓取和web抓取框架,用于抓取web站点并从页面中提取结构化的数据。Scrapy用途广泛,可以用于数据挖掘、监测和自动化测试。

      在本项目中用来爬取网站数据。

    • Django

      Django是一个开放源代码的Web应用框架,由Python写成。采用了MVC的框架模式,即模型M,视图V和控制器C。

      在本项目用来做搜索服务器的框架。

    • Haystack+Whoosh

      Haystack是一个Django上的应用,可以用于整合搜索引擎,它只依赖于它自身的代码,利用它可以切换不同的搜索引擎工具。Whoosh是一个索引文本和搜索文本的类库,它可以提供搜索文本的服务。

      在本项目中使用Haystack将Whoosh部署到Django服务器作为搜索引擎后端。

    • Jieba

      Jieba是一个python实现的分词库,对中文有着很强大的分词能力。

      在本项目用于对新闻进行中文分词和停用词过滤。

    三、开发环境和运行环境

    3.1 开发环境

    3.2 运行环境

    同开发环境

    四、系统模块

    4.1 网络爬虫模块

    定义用于Scrapy爬虫的数据类型,包括链接、标题和文章内容:

    1
    2
    3
    4
    class NewsItem(scrapy.Item):
    url = scrapy.Field()
    title = scrapy.Field()
    content = scrapy.Field()

    编写爬虫策略:

    爬虫策略的制定依据于网页源代码的链接形式,由于要爬取的是文字类新闻,所以要跟进与文字类新闻的链接。对于具体的新闻页利用回调函数爬取其链接、标题和内容。而对于新闻列表页,需要跟进下一页的链接。具体规则代码如下:

    1
    2
    3
    4
    5
    6
    7
    8
    9
    10
    11
    12
    13
    14
    15
    16
    17
    18
    19
    20
    21
    22
    class NewsSpider(CrawlSpider):
    print("news spider starting")
    name = 'news'
    allowed_domains = ['news.dlut.edu.cn']
    start_urls = ['http://news.dlut.edu.cn/']

    rules = (
    # 对于新闻页链接进行跟进
    Rule(LinkExtractor(allow=("xw/[a-z]+.htm"))),
    # 对于详细新闻页利用parse_item回调函数进行内容爬取
    Rule(LinkExtractor(allow=("info/\d{4,}/\d{3,}\.htm")),callback="parse_item"),
    # 对于新闻列表中的下一页链接进行跟进
    Rule(LinkExtractor(allow=("\d{1,}.htm"),restrict_xpaths="//a[@class='Next']")),
    )

    def parse_item(self, response):
    self.log("Hi, this is a new page! %s"% response.url)
    item = NewsItem()
    item['title'] = response.xpath('/html/head/title/text()').extract()[0]
    item['url'] = response.url
    item['content']=response.xpath("//div[@class='cont-detail fs-small']/p/text()").extract()
    yield item

    使用pipline机制将数据保存至数据库当中

    1
    2
    3
    4
    5
    6
    7
    8
    9
    10
    11
    12
    13
    14
    15
    16
    17
    18
    19
    20
    21
    22
    23
    24
    25
    26
    27
    28
    29
    class SpiderprojectPipeline(object):
    def process_item(self, item, spider):
    if spider.name == 'news':
    conn = sqlite3.connect('db.sqlite3')
    cursor = conn.cursor()
    title = item['title']
    url = item['url']
    content_tmp = item['content']
    content=""
    for p in content_tmp:
    content+=p.strip()
    sql_search = 'select arturl from search_article where arturl=="%s"' % (url)
    sql = 'insert into articles_article(title, content, arturl) values("%s", "%s", "%s")'%(title, content, url)
    try:
    #如果当前数据库中不存在该条新闻,则将新闻保存至数据库当中
    cursor.execute(sql_search)
    result_search = cursor.fetchone()
    if result_search is None or result_search[0].strip()=='':
    cursor.execute(sql)
    result=cursor.fetchone()
    conn.commit()
    cursor.execute(sql)
    result=cursor.fetchone()
    conn.commit()
    except Exception as e:
    print(">>> catch exception !")
    print(e)
    conn.rollback()
    return item

    4.2 搜索模块

    在要进行搜索的应用的models.py文件中建立model类用来表示要进行搜索的新闻文章

    1
    2
    3
    4
    class Article(models.Model):
    title = models.CharField(max_length=50)
    arturl = models.CharField(max_length=200)
    content = models.CharField(max_length=1000)

    同时使用django命令python manage.py makemigrationspython manage.py migrate生成数据库文件,并用爬虫得到的数据库替换生成的数据库。

    在django框架中配置Haystack+Whoosh来引入搜索模块

    1
    2
    3
    4
    5
    6
    7
    8
    9
    10
    11
    12
    # 配置搜索引擎后端
    HAYSTACK_CONNECTIONS={
    'default':{
    'ENGINE': 'articles.whoosh_cn_backend.WhooshEngine',
    # 索引文件路径
    'PATH': os.path.join(BASE_DIR, 'whoosh_index'), # 在项目目录下创建文件夹 whoosh_index
    }
    }
    # 当添加、修改、删除数据时,自动生成索引
    HAYSTACK_SIGNAL_PROCESSOR = 'haystack.signals.RealtimeSignalProcessor'
    # 每页显示十条搜索结果
    HAYSTACK_SEARCH_RESULTS_PER_PAGE = 10

    在要进行搜索的应用的目录下建立search_indexes.py文件

    1
    2
    3
    4
    5
    6
    7
    8
    9
    10
    11
    12
    from haystack import indexes
    from articles.models import Article

    class ArticleIndex(indexes.SearchIndex, indexes.Indexable): #类名必须为需要检索的Model_name+Index,这里需要检索Article,所以创建ArticleIndex
    text = indexes.CharField(document=True, use_template=True) #创建一个text字段

    def get_model(self): #重载get_model方法,必须要有!
    return Article

    def index_queryset(self, using=None): #重载index_..函数
    """Used when the entire index for model is updated."""
    return self.get_model().objects.all()

    在articles\templates\search\indexes\articles\下建立article_text.txt文件确定搜索内容

    1
    2
    3
    {{ object.title }}
    {{ object.content }}
    {{ object.url }}

    4.2 预处理模块

    使用jieba来进行中文分词,需要在whoosh_cn_backend文件中替换StemmingAnalyzer为ChineseAnalyzer

    同时引入停用词表,配置ChineseAnalyzer使其支持停用词过滤

    1
    2
    3
    4
    5
    6
    7
    8
    9
    10
    11
    12
    13
    14
    15
    16
    17
    18
    19
    20
    21
    22
    23
    24
    25
    26
    import jieba
    import re
    import os
    # 导入停用词过滤表
    stop_file_dir=os.path.dirname(os.path.dirname(os.path.abspath(__file__)))
    STOP_WORDS = frozenset([line.strip() for line in open(os.path.join(stop_file_dir, 'stop.txt'),'r',encoding='gbk').readlines()])

    accepted_chars = re.compile(r"[\u4E00-\u9FD5]+")

    class ChineseTokenizer(Tokenizer):

    def __call__(self, text, **kargs):
    words = jieba.tokenize(text, mode="search")
    token = Token()
    for (w, start_pos, stop_pos) in words:
    if not accepted_chars.match(w) and len(w) <= 1:
    continue
    token.original = token.text = w
    token.pos = start_pos
    token.startchar = start_pos
    token.endchar = stop_pos
    yield token
    def ChineseAnalyzer(stoplist=STOP_WORDS, minsize=1, stemfn=stem, cachesize=50000):
    return (ChineseTokenizer() | LowercaseFilter() |
    StopFilter(stoplist=stoplist, minsize=minsize) |
    StemFilter(stemfn=stemfn, ignore=None, cachesize=cachesize))

    配置完成后使用python manage.py rebuild_index建立搜索索引

    4.4 交互模块

    搜索首页html关键代码:

    1
    2
    3
    4
    5
    <form method='get' action="/search/" target="_blank">
    <input type="text" name="q">
    <br>
    <input type="submit" value="查询">
    </form>

    首页如下图所示:

    查询结果页html关键代码:

    1
    2
    3
    4
    5
    6
    7
    8
    9
    10
    11
    12
    13
    14
    15
    16
    17
    18
    19
    {% load highlight %}
    <h3>搜索&nbsp;<b>{{query}}</b>&nbsp;结果如下:</h3>
    <ul>
    {%for item in page%}
    <li>{{item.object.title|safe}}</li>
    <p>{% highlight item.object.content with query %}</p>
    <a href="{{item.object.arturl}}">{{item.object.arturl}}</a>
    {%empty%}
    <li>啥也没找到</li>
    {%endfor%}
    </ul>
    <hr>
    {%for pindex in page.paginator.page_range%}
    {%if pindex == page.number%}
    {{pindex}}&nbsp;&nbsp;
    {%else%}
    <a href="?q={{query}}&amp;page={{pindex}}">{{pindex}}</a>&nbsp;&nbsp;
    {%endif%}
    {%endfor%}

    其中使用

    1
    2
    {% load highlight %}
    <p>{% highlight item.object.content with query %}</p>

    进行搜索结果的高亮显示

    最终搜索页面如下图所示:

    五、项目代码

    代码链接